Showing posts with label HSF. Show all posts

Friday, January 14, 2022

Historical Sew Monthly 2022!

It's a new year, and the Historical Sew Monthly marches on!

To be sure, I haven't done any costume projects for years, and still owe pictures for the last (small) one I completed.  Moreover, in November I started a new, part-time job with weekly time expectations.  

But I have not given up hope on actually doing costuming work again.  And I'm finding the new HSM Challenges inspiring.  The list is below:  I have cut and pasted it from The Dreamstress's blog; my comments on each appear in bold after the text for each challenge.

January: Anniversary Choice: It’s the 10th year of the HSM! Go back 10 years and choose any challenge from the 2013 HSF Challenge list, and make something for it! In 2013 we tried to do this fortnightly, so there are 26 options!  I still have many projects for which I have at least bought the materials, though I'm pretty sure I won't manage this by the end of January.

February: Neck & Shoulders: Make something to wear around your neck or on your shoulders.  There is my volva cloak, though to trim that completely may take me a while.  The lambskin hood is better; I started mocking up a pattern.  Perhaps I can finally nerve myself to save up for and buy the necessary materials....

March: Non-Woven. Make something not based on woven materials. There’s a whole world of possibilities. Braiding, carving, crocheting, felting, knitting, knotting, naalbinding…and…felting!  Felting has always interested me.  Perhaps a fez-like hat, to accompany an Assyrian outfit (see December reference below).  Or maybe start again to learn sprang by making a bag or a hood?  A sprang bag could fit under the challenge for March or April!  

April: Bags: Make a bag! Easy-peasy, if uninspiring.  If I had not made a Viking-style bag with wooden handles, that might have been an option.  I need to think about this one.  EDIT:  2/19/2022  I will make a small, drawstring bag, to hold a small polished bronze mirror, 1 and 9/16ths of an inch (4 cm) across. The Fairy Tales Chest on Etsy sells such mirrors, a replica of a find from Great Bulgaria during the right time period (8th-10th c. CE), and I've almost decided to get myself one as a birthday gift.  Sprang would be fun but I'll probably just sew a little bag instead; heaven knows I have enough scrap wool and linen lying about.  It will probably be a wool bag with a linen lining.

May: Protection: Create a garment that protects you from something: weather, dirt, wear, weapons, etc.  The volva's cloak, it haunts me....

June: At the Museum: Be inspired by the items and research available in museums and archives.  Need to think about this one.  Possibilities abound.  Perhaps my long-planned Kostrup-style apron dress?

July: Geometry: Make something with pattern pieces based on basic geometry, or that somehow incorporates geometric design elements.  I still have the white wool that was going to be the volva's tunic; maybe this is the year to get that done!  Like most pre-medieval and medieval garments, it's assembled from geometric shapes based on the measurements of the intended wearer.   EDIT:  2/19/2022  This should be simple enough to do, even if I sew it entirely by hand, as I plan to do.  

August: As Seen On Screen: Make something inspired by something you’ve seen on screen, whether it’s film, TV, or YouTube.  There are plenty of YouTubers demonstrating constructing of historical styles, many incorporating authentic techniques.  Need to think about this one too.  

September: Colour Challenge: Blue: Make something in any shade of blue.  My planned Vendel apron dress leaps to mind. The fabric for it is a deep blue, and making it will be simple; a line of sewing down the side, and at least a hem around top and bottom would do it.   EDIT:  2/19/2022  Also simple.  In fact, simpler than the volva's underdress; it would simply be a hemmed tube sewn closed along one long side.

October: A Perfect 10: It’s the HSM’s 10th anniversary, so make something 10 themed. 10th century, the something-10s, something that incorporates 10 of something? Be creative with it!  Perhaps revive a project that I've had pending since 2010?

November: Fitting: Make something that focuses on fit.  Socks?  Or the volva's hood?

December: New Era: Make something from a decade or century you’ve never made from before, or make something that represented a new era in fashion in its time.  I've been admiring Angela Costello's forays into ancient Assyrian costume.  Perhaps an Assyrian tunic? Wow.  That would be quite a leap! 

Sunday, February 25, 2018

Me and the HSM

I really like some of this year's Historical Sew Monthly challenges.  I've had a slow start this year (i.e., it's February and I haven't made anything yet), but there are quite a few themes on this year's list that I can imagine doing, and would like to do since I haven't done any historical sewing in too long.  Here's a sample of some of the projects that fit into this year's HSM monthly themes and where they might fit.

A Viking Age Bag.  My latest project--making my own Hedeby bag using an inexpensive pair of wooden frames found on Etsy.
Works for:  April:  Buttons and Fastenings: "Create an item where the closures are the star of the show.".  (Thank you, Stella, for pointing out that the bag's unique closure works for this challenge!)
Works for:  November:  Purses and Bags:  You've got your arms covered in July, your hands in September, now make something amazing to dangle from them!

Køstrup Apron Dress.  Another recent idea:  Make my own pleated-front apron dress to try to work out how the tablet-woven band on the Køstrup apron dress may have been sewn onto the dress.
Works for:  August:  Extant Originals:  "Copy an extant historical garment as closely as possible."
Works for:  October:  Fabric Manipulation:  "Take fabric to the next level with any kind of historical embellishment or manipulation:  smocking, shirring, embroidering, beading, pinking, ruching, printing, painting, dyeing, etc."

The Völva Shift.  The long, wool dress that is to be the underlayer and foundation of my long planned but barely started völva costume.
Works for:  February:  Under:  "Make something that goes under the other layers."
Works for:  March:  Comfort at Home: " Make something to wear around the (historical) house."

The Völva Cloak. The long, wool cloak that will be the most conspicuous part of the volva costume.
Works for:  April: Buttons and Fastenings:  Description below. As I've said before, I believe the völva's cloak fastened with long ties or straps, which were a prestige item on cloaks in late Viking Age Northern Europe.

Embroidery for the neckline and cuffs of my Byzantine Tunic.
Works for:  October:  Fabric Manipulation:  Description above.

Nalbinded Mittens or Socks.
Works for:  September:  Hands and Feet.  Create a fabulous accessory for your hands or feet.

And, of course, anything I don't manage to do earlier can be presented for December:  Neglected Challenge!   (E.g., Any challenge from this year's HSM, or any HSM or Historical Sew Fortnightly challenges that never got completed!)

Sunday, January 4, 2015

The Historical Sew Monthly--New Projects!

The Dreamstress decided that, to relieve stress on both herself and the other participants, this year's Historical Sew Fortnightly would become a Historical Sew Monthly, with projects due at the end of every month, instead of every two weeks.   I thought it might be useful to me, and amusing to some of my regular readers, for me to list my reactions to the various challenges, and the projects I'm planning to make for each.

JanuaryFoundations: make something that is the foundation of a period outfit.   YES!
I still want to complete the white wool shift that was to be the foundation for both my early Norwegian outfit and my völva outfit.  The only trick may be finishing it on time.

February – Colour Challenge Blue: Make an item that features blue, in any shade from azure to zaffre. YES!
I could make either the overdress for my early Norwegian outfit (for which I already have fabric) or the völva's cloak (for which I'd need to buy fabric) for this one.

March Stashbusting: Make something using only fabric, patterns, trims & notions that you already have in stash.  MAYBE.
I have some wool that I'd overdyed rather poorly in a sky blue shade (so that it has a blotchy/streaky look).  Maybe that wool (which has been washed) would make a good pair of cut-and-sewn stockings?  There's more than enough fabric--maybe even enough for several pairs.  If I can find the pattern I made for myself the last time I made stockings, this could be a good project.

AprilWar & Peace: the extremes of conflict and long periods of peacetime both influence what people wear. Make something that shows the effects of war, or of extended peace. PROBABLY NOT.  
I can imagine a lot of projects that might fit into this category: World War II dresses, Garibaldi blouses, Landsknecht outfits, French Revolutionary cockades. But none of these possible projects inspire me. I'll probably sit this one out.

May – Practicality: ... Create the jeans-and-T-Shirt-get-the-house-clean-and-garden-sorted outfit of your chosen period.  MAYBE.
The difficulty here is that, for anything before 1500, the "jeans and t-shirt" equivalent is, for sewing purposes, the same as the high-fashion one, except it's made from cheaper fabrics and/or is nearly worn out.  If I get a bright idea for this challenge, though, I'll join in.

June – Out of Your Comfort Zone: Create a garment from a time period you haven’t done before, or that uses a new skill or technique that you’ve never tried before.   YES!
The sprang frame I made last March is still sitting in my closet (to guard it from my new cat); I'd like to warp it and finish a sprang project this year if I can.

July – Accessorize: The final touch of the right accessory creates the perfect period look. Bring an outfit together by creating an accessory to go with your historical wardrobe.   MAYBE.  
I am planning to make bead strings for the rectangular brooch I'm going to wear with my early Norwegian outfit, but that won't take much effort (except in finding suitable beads at a suitable price). Perhaps I can make the hood for my völva outfit for this challenge.

August – Heirlooms & Heritage: Re-create a garment one of your ancestors wore or would have worn, or use an heirloom sewing supply to create a new heirloom to pass down to the next generations. PROBABLY NOT.
I don't have much in the way of heirloom sewing equipment, and I know little enough about my ancestors and about early period clothing in their parts of Europe to be unsure what sort of garment to make.  Also, August is likely to be very busy for me this year.  I'm not sure what I'll do yet.

September Colour Challenge Brown: it’s not the most exciting colour by modern standards, but brown has been one of the most common, and popular, colours throughout history. Make something brown.   YES!
I like this idea--before the Bronze Age most clothing in northern Europe would have been the color of undyed wool, much of which is brown.  But I'm not sure what sort of garment to make this time around.  This one needs more thought.

October – Sewing Secrets: Hide something in your sewing, whether it is an almost invisible mend, a secret pocket, a false fastening or front, or a concealed message (such as a political or moral allegiance).   MAYBE.
I like this idea but I'm not sure how to implement it.  I'm reluctant to damage a garment just to be able to show off my mending skills.  I could try to add some fabric to my Hedeby dress to make it fit me better, but picking apart its solidly-sewn seams in order to do that feels more like a chore than like fun.  I need to think about this one too.

November – Silver Screen: Be inspired by period fashions as shown onscreen (film or TV), and recreate your favourite historical costume as a historically accurate period piece.   PROBABLY NOT.  
I don't have a great deal of knowledge of movie fashions, and the movies that have bothered to depict early period events are usually so far off the mark that one would have to scrap the entire design to make a "historically accurate period piece".  I'll sit this one out.

December – Re-Do: It’s the last challenge of the year, so let’s keep things simple by re-doing any of the previous 11 challenges.  YES!
I will almost certainly miss one of the challenge deadlines, so it's likely I'll be doing this one, one way or another. 

Saturday, January 3, 2015

My Roman Necklace

The complete parure.
The completed necklace.
Before life creeps up and mugs me again, I figured I'd make and share some photographs of my Roman necklace. The photograph showing the necklace in wear was taken by my wonderful husband.  

Because it's so shiny, it's hard to photograph the necklace in such a way as to give a good idea of its true color--the pearls are more pink than golden in color, contrary to what you see in the picture on the top right.  The photograph on the left of the post shows the necklace being worn with the earrings I'd previously made, using the same type of glass pearls.

Since I finished the necklace, I've been looking more closely at actual period necklaces of this type, and they do a better job of closing each loop; on some, the loops look as though the end of the wire is wrapped around the shaft, or at least is tucked inside the bead hole.  On the other hand, a piece of my necklace fell off while I was laying it out for the photograph, and I was able to correct the problem simply by squeezing the loop a bit tighter after reattaching the errant piece.
For comparison -- Necklace, Roman or Byzantine
c. 400 CE.  Photo:  Kunstpedia Foundation (artwis.com)

Unfortunately, when I was donning them for the photographs, the earwire on one of the earrings broke!  I actually put both earrings on for the photo session (though you can't see the broken one in the final photograph) but it would not stay put in normal wear; I'm going to have to re-make one of the earrings. Fortunately, the re-make will only require buying more earwires and finding the rest of my crimp rings, though it's annoying to have to remake the earring at all.

The necklace shown on the artwis.com site dates to 400 C.E., but I've found necklaces of a similar design from about 100 C.E. onward.  It's an easy to make and wear style, and could even be worn with modern fashions.  If I end up making ancient Roman clothes, I will probably make a few more of these necklaces with beads of different colors.

EDIT:  (1/7/2014)  One commenter asked me how fake pearls were made in ancient Rome.  I didn't have time to do serious research on the subject, but I found several references on the Internet repeating the claim that the ancient Romans made fake pearls by coating glass beads with silver, and then adding a coating of glass on top of the silver. I'm not sure how effective this would have been or what the source of the claim was, though I'll continue trying to find out.  The first place I found it reported on the Internet was here: http://big-bead-little-bead.blogspot.com/2011/07/history-man-made-faux-pearls.html

EDIT:  (1/10/2014)  I have re-made my broken earring; now I have the full set again.

Friday, January 2, 2015

The Roman Beaded Chain Necklace--Complete!

Happy New Year, everyone!  This post, my first post of 2015, will to document my completion of the last challenge I completed for the Historical Sew Fortnightly of 2014. 

The final challenge of the Historical Sew Fortnightly for 2014 was "All that Glitters".  The objective was to make a historical costume item that was shiny or glittery.  I had decided long ago to make an ancient Roman style rose gold pearl beaded chain necklace, to match the Roman earrings I had made for the "Heads and Toes" challenge.

Despite the fact that the jump rings I bought for the necklace are of a finer gauge than the wire I used for the rest of the necklace and my difficulties in making "tight little loops" of wire as Stephens's video directs, I think the necklace turned out rather well.   To my surprise, I needed fewer beads than I feared that I would need to make the necklace as long as I wanted it to be; the combination of jump ring connectors and wire links for each bead extends the length easily without requiring many beads. Perhaps that is why the Romans used this technique--it allowed the jeweler to use fewer precious stone beads (such as emeralds) to make a full necklace, and if the necklace broke, you were unlikely to lose more than one bead, if any.  

I'll post photographs sometime this weekend, but for now I want to record the basic statistics.

The Challenge:  #24--All That Glitters

Fabric:  None involved, since this item was made from Swarowski glass pearls, rose gold plated silver beads, rose gold filled  (I can't recall now if the wire is gold filled or plated); brass wire, and rose gold jump rings.    

Pattern:   I followed Janet Stephens' tutorial video on how to make a Roman beaded chain necklace. 

Year:   Roughly first century C.E. 

Notions:  Eight rose-gold plated silver beads, 8mm; eight rose-gold Swarowski pearls, 12 mm; 18 gauge rose gold filled brass wire in a surprisingly tiny quantity; about 30 rose gold wire jump rings in 20 gauge wire; and a pre-made rose gold wire clasp (gauge unknown, but thicker than 18 gauge).

How historically accurate is it?   The basic design is period.  The Romans used real pearls and metal beads in their jewelry, and so far as I know glass pearls also are period.  The main differences are that I used pre-made jump rings and a pre-made clasp.  So I'd say 90%.

Hours to completeAbout an hour and a half, not counting the time it took me to select all the materials and watch Janet Stephens's video a few times.

First worn:  Only to confirm that the necklace was the right length.  I will post photographs of the necklace in wear soon.

Total cost:  About $40.00 (including the round-nosed pliers I bought for the project; not including the beads I originally bought and ultimately rejected).  Now that I know how economical this type of design is and have some wire and jump rings left, I could make another such necklace much more cheaply.

Thursday, November 6, 2014

The Battle Plan, Post-Contact

Among military gamers (and serving military personnel, for all I know) there's a saying:  "No battle plan survives contact with the enemy."  This means, more or less, that no matter how good a plan is, real-world circumstances may reveal that it has so many problems as to be unworkable, or incapable of achieving the desired victory.

That's the sort of thing that's happened to my project for Historical Sew Fortnightly #20--Alternative Universe.  I planned to make a costume based upon the science fiction of M.A. Foster; specifically, a costume intended for "amorous dalliance" by a member of the constructed human subspecies featured in Foster's books called the ler.  This was to consist of a loose translucent blouse that tied at the hip and shoulder, and a long, flowing loincloth.  Because I saw the loincloth as the "easy" part of the project, and because I've been unusually busy at work, I figured I would wait to start until the loincloth fabric arrived.  

Well, the loincloth fabric didn't arrive from India ("Indian fabric") until a few days ago--shortly after the HSF #20 project deadline.  So any costume I make for Challenge #20 will be late (or will be forced into the "Re-do" Challenge or some other challenge).  

The fabric itself is great in some ways.  The color and motifs are exactly as pictured on the Etsy website of the vendor from whom I bought the fabric.  Unfortunately, the fabric, though very light, is not flowy; it's crisp and stiff--not at all what Foster's book depicts or the effect I wanted to achieve. It's possible that a few washings may soften it somewhat; I'm going to try that next.

But I have a bigger problem--the amount of fabric I have for the loincloth.  Because the price of this fabric was $12.00 USD a yard, I tried to economize by purchasing only two yards of the stuff. However, experimentation reveals that if I use the tuck-the-fabric under a belt in front and back method I planned, the loincloth will, at best, be knee length, not ankle or floor length as the book describes and as I wanted.   Grr.

The fabric is 44 inches wide.  I can cut it in half--into two 22-inch, two-yard long pieces--and sew them together, end to end.  This should be more than long enough for a tucked loincloth, but will be so narrow as to expose most of my thighs, which is also not an effect I intended.  Clearly, the economy I attempted to practice was a false one, because now I need to obtain MORE fabric to get the effect I originally visualized.  

But I still want to make the costume (especially since my husband really liked the glimpse he caught of me trying to tuck the too-short Indian fabric through my bead belt) so, poor economy or not, I'm going to proceed.  The question now is how, or whether, I can redesign the costume to get some use out of the fabric I already have--namely, the thin yellow jersey (jersey) and the Indian fabric.  These are the alternatives that occur to me: 

1.  Buy some plain sandwashed rayon fabric (2 1/2 yards at least) in a nice color (brown, say) for the loincloth and tuck a narrow panel of the Indian fabric over it, as an overlay.  Make the blouse from the jersey as originally planned.

2.  Give up on using the Indian fabric for the loincloth altogether.  Buy plain sandwashed rayon or something similar and use it for the loincloth; make the blouse from the jersey as planned.

3.  Buy some plain sandwashed rayon fabric in brown for the loincloth.  Make the blouse from alternating panels of the Indian fabric and the jersey.  Or (better) use the Indian fabric for the long, sash-like bottom piece of the blouse (the piece that ties at the waist), and make the rest of the blouse from the jersey.  

Right now I'm leaning toward alternative 3, but I will cheerfully listen to advice about how to proceed.  If you're at all interested in this costume idea of mine, please step up and let me know what you think in the comments.

EDIT (11/22/2014):  I took Beth S.'s advice (see Comments) and bought a yard of a soft, thin jersey to piece in to my fabric where it won't show (i.e., as the part that will actually touch my crotch). Now to do the actual washing and sewing.

Sunday, August 31, 2014

HSF Challenge # 20--Fabrics

Ribbon for the stel*
For the dhwef*
After trawling the Internet for an hour or two, I finally came up with a combination of fabrics I like for my science fictional costume for HSF #20.  The fabrics I'm planning to order are pictured  below and to the left. They were chosen to flatter my hair color and skin tone while being consistent with the subtle tastes of the alternate human species, the ler, described in M.A. Foster's novels.

For the stel*
For the stel (i.e., the blouse), I've chosen a rayon jersey in a lovely shade called "yellow orange mango."  Instead of stitching the shoulders together as in the Deco Echo blouse design, I plan to sew ribbons on all four corners at the neckline so that it ties on each shoulder. The ribbon pictured here, from an EBay vendor, harmonizes well with the mango jersey.

For the dhwef (the long loincloth), I found a thin cotton from India that is only 44 inches wide.  My thought now is not to cut it, but to use 2 yards of the entire width of the fabric, only hemming the ends, and folding the center portion so the entire fabric width is narrow enough to pass over my crotch. That way, the piece will still be more than full enough to flow around my feet as I walk, without cutting or shaping. The design, a modest pattern evocative of the shape of the vulva, is perfect for the type of sexual reference one might expect from one of M.A. Foster's ler.
My bead belt

I am not home right now, or I would find and photograph the bead belt I plan to use to hold the loincloth.  I made the belt for my recreation of the "Princess of Zweeloo's" costume (based upon a 5th century CE archaeological find).  Because it uses mostly wooden beads instead of glass ones, it's probably better suited for my science fiction costume.  I will add a picture of the belt to this post later.

EDIT [9/14/2014]:  Added a photograph of my bead belt.

*  All photographs from the sites of their respective vendors. The yellow orange mango jersey comes from StylishFabric on Etsy; the cotton print comes from theDelhiStore on Etsy; and the ribbon from Cheswick-and-Company on EBay.

Sunday, August 17, 2014

Dhwef-Meth-Stel

For HSF Challenge # 20, Alternate Universe, I have decided to make a costume based upon this description from M.A. Foster's novel 1979 science fiction novel, The Day of the Klesh:
Basic forms of Ler clothing remained static, and were oriented toward one or another of the four elementals [sic], Fire, Air, Earth, Water.  Stel was a gauzy, translucent, loose blouse, tied with ribbons at the top, which has a loose, open neck; below, it fell about to the hips, where it was tied with another ribbon.  Dhwef was a long, wide, trailing loincloth, the ends falling to the feet.  The upper end was usually held in place by a string of beads or, in extreme cases, a chain of flowers.  The mode most common to wearing of the Dhwef could be politely described as the "mood conducive to amorous dalliance." It could also be described as an invitation to the same.  Needless to say, after the Ler manner this was behavior governed by the Water Elemental.  (p. 46)
The ler in Foster's novel are a species of human that were created in our near future by genetic engineering that was intended to create a superhuman race.  It didn't quite work. Ler (usually not capitalized in this or Foster's other two related novels) are short and slight of build--they appear like androgynous children to humans. They are, on average, more intelligent than homo sapiens sapiens, but the most significant differences between humans and ler are two-fold; they have eidetic memory, and a very low birthrate. Although ler reach sexual capability in their teens, as humans do, they are not capable of siring or conceiving children until they reach their 30s. Incessant sexual activity during the infertile period is supported and encouraged by ler culture, and Foster's books describe that aspect and other aspects of ler culture in surprising detail.   Anyone who is interested in learning more about the ler and the world of Day of the Klesh should read that book and its two prequels, which Wikipedia describes here.

The costume described in the passage above is worn by ler adolescents/young women who are in this infertile sexual phase and, as Foster archly says, looking for "amorous dalliance."  At 55 I'm a bit too old (and a bit too wide) to look like a proper ler, but I do look younger than my age, and the culture of science fiction conventions is pretty tolerant.  So I may as well make it now and wear and enjoy it while I still can!

The costume should be simple and quick to make; it consists of a blouse and a loincloth that would look a lot like a long skirt in wear.  The stel sounds to me very like The Dreamstress's Deco Echo blouse, but made from a translucent fabric and with ribbons tying the neckline as well as a tie at hip level.  In the novel, of course, explicit sexual display was the point of the costume, but I'm not prepared to be that explicit on the Internet, so I will probably model the finished product over an opaque camisole top (or perhaps chicken out and just make the blouse from opaque cloth like the Deco Echo blouse). Foster's description of the lower body garment, the dhwef, is vaguer still, but John Norman, another science fiction/fantasy writer of the period, described a plausible way to make such a woman's loincloth in his non-fiction book, Imaginative Sex:
A cord may be tied about her waist.  It should be tied in such a way that it cannot be casually yanked loose. It supports, say, a rectangle of silk in the front and rear, thrust over and behind the cord.  If it is desired a long piece of silk can be passed over the front cord, between her legs, and then up and under, and over, the cord in the back.  It should then be made snug to her body.  (pp. 249-250)
I already have a string of beads for my waist (part of a Migration Period costume) that could serve as the "string of beads" to support the type of loincloth Norman describes (which I'll wear over bikini briefs, of course).  To make the loincloth appropriately "trailing" I could shape it so that the hem is wider than the portion that fits against the body.

This costume should be inexpensive to make because it can be made entirely from synthetic fabrics, and I'd prefer to make it from synthetics so it will be easy to care for.  A soft gauze would be suitable for the stel, and a silk substitute such as a rayon or polyester charmeuse would do for the dhwef, but what is puzzling me is color choice. Should the colors be light, dark, or bright?  Would patterns be appropriate?  If so, should both top and bottom be made from patterned fabric, or should just one or the other be patterned? Should the patterns match, harmonize, or clash?  And what kind of patterns would be appropriate?

Foster notes that the ler are famed for their appreciation of subtlety, and what seems hopelessly drab to a human could well have a subtle appeal for a ler.  That probably means that very bright or very dark colors are probably out. I'm thinking that I should choose a pale solid color for the stel and a drapey rayon with a small geometric pattern or perhaps stripes for the dhwef.  With luck, I should be able to find something that fits within those parameters, though I haven't been pleased with the patterned rayon fabric I've seen on the Internet so far. 

Tuesday, August 12, 2014

Ideas for a Roman Necklace


I have been planning for months now to make a necklace with good quality rose gold fake pearls and rose gold findings for Historical Sew Fortnightly Challenge No. 24, "All that Glitters," to coordinate with the earrings I made for Challenge No. 7. It was my original thought that I'd string rose gold pearls of two different sizes, using rose gold plated beads as spacers.

A few days ago, however, I learned that Janet Stephens has done her own video on how to make a common style of Roman necklace, which she refers to as a "beaded chain" necklace.  The video in question appears to the left of this post.  Despite the name, no actual chain is involved.  Instead, you string each bead on a small piece of wire and bend the ends into small round loops.  Then, you connect each pair of beads with a third piece of wire (or a modern jump ring), until you have "chained" all of the beads together.  Add a simple hook to one end, and you have a necklace.   Stephens gives directions for making your own clasp from the same wire used to make loops for the necklace, but I had already ordered a rose gold plated hook-and-eye clasp that looks very similar to the wire clasp Stephens shows the viewer how to make, so I will use that for my necklace.

If I adopt this approach, I won't need rose gold spacer beads; I could use just rose gold pearls.  However, lovely as the pearls are, they don't "glitter."  I thought it would be lovely to intersperse the rose gold pearls with gold foil glass beads (i.e., clear glass beads with gold foil inside), but I couldn't find any evidence that foil beads are period for ancient Rome.  I settled upon faceted pink glass beads with an iridescent gold luster.  Probably that kind of color isn't period either, but faceted beads are, and an ambitious glass maker might have come up with such a color as a one-off experiment with trace additions to the glass, right?  ;-)

So I have already ordered the clasp, jump rings, and the iridescent beads.  I guess that means I"m committed to this plan.  I can hardly wait to see how it all turns out.

EDIT:  (8/15/2014)  I have ordered all of the components except for the rose gold wire, and I have a potential source for that.  There's no rush, since the deadline is New Year's Day and the idea is to complete each challenge no earlier than about a month before.  But it will be good to see whether the pearls and iridescent pink glass look good together before I start working on the necklace!

2nd EDIT:  (8/17/2014)  I received my pearls and the iridescent beads yesterday, and I already have to change my plan.  The holes in the beads are too small to take 18 gauge wire, and the iridescent beads are way too dark--they look dreadful with the pearls.  I can still buy rose gold (filled or colored) metal beads instead, but I'm now uncertain about whether to stick with the beaded chain idea, since I'd probably have to use a 20 gauge wire or smaller to make the necklace work.  The best part about the beaded chain idea is that it lets me make a necklace of the size I want with significantly fewer beads, so I'm not ready to give up on that quite yet.

3rc EDIT:  (8/19/2014)  I have a solution; there's a website that sells the same color of pearls I've been using, so I can use 18 gauge wire after all.  Though I hate the additional expense, I can always use the other pearls for another project.  My plan now is to make a beaded chain necklace with the new pearls  and with smaller rose gold-filled beads.  

Monday, July 21, 2014

HSF #13--A Coppergate Cap

Because I was planning to be away on vacation for most of the week of July 14, I needed a quick project (again!) if I was going to participate in the "Under $10" challenge.  It took me a while to decide upon one that fits in with my interests, but I finally hit upon one I find very satisfying.

Recently, I managed to obtain a copy of Penelope Walton's (now Penelope Walton Rogers) book on the textile finds at the Coppergate site in York, England.  The book has been out of print for years and the cheapest copy I have ever seen on the market before now was priced at nearly $200.00 USD.  So I was pleased when ALibris, acting on a wish list reminder I'd left years ago, sent me e-mail about a copy that was available for about $33.00 USD after including shipping costs from Germany. In reading the book, I was particularly impressed with the precision of Walton's description of the silk cap found at Coppergate.  I knew I had some unused silk purchased for another project in more than sufficient quantity (about a yard and a half), so I decided that a Coppergate cap would be my $10 project.   I almost finished the cap on July 14, but because we were scheduled to leave for vacation early on the morning of the 15th, I didn't quite manage it.  However, I was able to finish it today, so now here it is, along with my ruminations on making and wearing the cap.

The completed cap
Cap inside out, showing the inside seam
I wanted to make the tie strings from the same silk used for the cap--but realized, in the nick of time, that it would be nearly impossible to tie such a slippery silk securely to itself.  The worker who made the original cap must have come to the same conclusion, because Walton detected vegetable fibers consistent with linen at the points on the cap where the tie strings must have been sewn.  I could have used some of my leftover white ramie for the tie-strings, but I wasn't able to find it after a quick search--and didn't have the energy or time to make a more intensive search for it.

I attempted to use the dimensions of the original cap--roughly 23 inches by 7 inches.   This piece of fabric produces a very shallow cap compared to the one I made previously.  It occurs to me that the original might have been for someone with a much smaller head than mine, but it's also possible that the overall effect shown in my pictures was the intended one--without additional evidence, it is impossible to tell.  In addition to the shallowness of the cap in generaly, sewing the curve along the back of the head was problematic.  Walton said that the cap was sewn up in the back with a curve ending at a point about two inches (50 mm) from the rear corner, but when I did that, my cap still had a small, nubby point, and not the smooth curve over the top of the head shown in Walton's sketches.  So I re-sewed the seam a few more times until I got a curve that better approximated Walton's sketches.  As a result, I had two points to fold aside inside the cap, not just the one Walton reports on the original (see photograph above).

Since the original cap was not found in a grave, there's no evidence about how it may have been worn.  I came up with three ways (see photographs below). One is to tie it under the chin.  A second is to tie it under the chin, but with the edges of the cap tucked behind the ears, and the third is to tie it at the back of the neck, under the occipital bone.  In all three pictures, I am wearing the cap with my hair fastened into a bun just above the nape of my neck.  That hairstyle gives the cap the most flattering shape; the problem with the cap forming a "point" at the top of my head was more obvious and less attractive when I did not do this.

All three methods look pretty similar in wear, though I prefer tying the cap in back because it hides the darker linen tie-strings and produces a slightly more becoming position of the front corners.  With or without a bun, however, this cap is much more attractive than my last attempt to make such a cap with the tie-strings fastened directly to the bottom corners.  The higher location for the tie-strings is also consistent with Walton's finding of linen fragments and indications of tie-fastening-stitches about 5-6 inches from the lower corners of the original cap.

One final note:  Walton's sketches show a series of wrinkles while the cap was in wear, parallel to the line of the shoulders.  My design fits too closely over my head to produce such wrinkles.  Could it be that the original was that much shorter (or longer) than the head of the original wearer? Or perhaps the fact that the original seems to have been made of a less slippery silk in a different weave (tabby) made the difference.  I may have to make another cap to see whether I can come up with a theory on this subject.

THE CHALLENGE:  #13 -  Under $10

Fabric:   A rectangular piece of fine white silk twill, about 23 inches by 7 inches, purchased long enough ago that I don't remember the price (but a piece small enough for this project would have been well under $10).  Also some scraps of natural-colored linen, from the fabric I bought for the bog blouse project, to make into tie strings.

Tied at back of head
Tied under chin, in front
Pattern:  I  followed Penelope Walton's detailed description of the nearly complete silk cap found in the Viking age levels of the Coppergate (York) dig, from her book The Archaeology of York:  Vol. 17: The Small Finds, Fascicule 5: Textiles, Cordage and Raw Fibre from 16-22 Coppergate pp. 360-363  (York Archaeological Trust 1989).

Year:   Approximately 975 CE, according to Penelope Walton. 

Notions:  Gutermann brand silk thread, in white.

How historically accurate is it?   Mostly. The pattern, even down to the size of the rectangular piece of fabric used to make the cap, is based on Walton's description of the actual find.  I incorporated a selvedge along one long edge in cutting the rectangle, like the original, and hemmed the piece all around with a rolled hem using silk thread, like the original, and the original has vegetable fiber remains in the right place to suggest that it had linen tie strings.   I also took care to place the tie-strings in the approximate location suggested by Walton's examination, and tried to sew the back seam curve in a similar position.  However, my silk fabric is a 2/2 diagonal twill, not a tabby, and it's a balanced weave, unlike the original (though it's roughly comparable in fineness to the original).  The original was not tested for dyes, and is now a golden brown, though Walton suggests that an undyed silk likely would have been a pale gold, not white, in color.  (Some of the photographs make my cap look gold, even though the fabric is snowy white; the photographs showing the cap in wear give a more accurate impression of the color.)  So about 70%-80%.
Tied under chin, behind ears

Hours to complete:   About 3 hours.  The original had a rolled hem on all four edges (even though one was a selvedge), and that hemming was the slowest and most finicky part of the job, and not just because I'm inexperienced at doing rolled hems.  The technique I learned for rolled hems requires you to crease the edge, a little at a time. With linen (and ramie, where I first tried it out) this is easy, because the fabric will stay creased once you've creased it.  Silk won't, though it may retain the mark of the crease for a bit while the fabric unbends. That means you have to grip the fabric by the fold while you're putting the stitch through it, and repeat the entire crease/grip process for each individual stitch, which is exhausting.  Also, I found it difficult to place the stitches so that the raw edge is completely curled under and hidden.  (It didn't help that my fabric had a fringe of loose threads extending a few millimeters beyond the selvage area.)

First worn:  For the photographs accompanying this post.

Total cost:  $0.00; I've had the silk fabric and thread for years, and I'd acquired the linen as part of a different project.  

Sunday, July 6, 2014

The Bag Tunic, in wear

Here are some photographs of my computed Egyptian Bag Tunic.  Please excuse the lack of sand, sun, bazaars, and pyramids, since we don't have any of those scenic elements where I live.  Also, the tunic is a bit rumpled, since by now it has been rolled, folded and just plain tossed a number of times.  All of these photographs were taken by my patient husband.

I had photographs taken with each of the two different ways that I devised for belting the tunic, but I find that I can't tell them apart for certain now that I'm looking at them!  I've also experimented a bit with some more-or-less period Egyptian accessories.  

My next Egyptian tunic will definitely be a Deshasheh tunic, and I want to take my time with it, since properly made it could become part of my regular wardrobe.  This one is a bit too full to wear for ease and comfort, and the wool cord around the neckline, through really sharp looking, prickles just a bit.
Unbelted.
Belted under the sleeves.
Belt through the sleeves?

Monday, June 30, 2014

HSF Roundup

I am overwhelmed with how many projects the Dreamstress has managed to complete for the Historical Sew Fortnightly, even during a year where life is catching up to her much more than usual.  Of the twelve challenges presented by the Dreamstress for the first half of 2014, I have completed only these four:
  • #1: Make Do & Mend: due January 1.   I added a strip onto the bottom of my Byzantine himation so that it would be properly long enough.  Not a lot of work was involved, but the result was very satisfying.

  • #5: Bodice - due March 15.  I made a "bog" blouse--a Bronze Age Scandinavian garment of which several examples have been found--from natural colored linen instead of wool.  Photographs of me wearing it may be seen here

  • #7: Tops & Toes – due April 15.   Of course, all I made was a simple pair of ancient Roman styled earrings, of which I need to get a better photograph, but you can see what they look like here.  

  • #9: Black and White – due May 15.  This was the ancient Egyptian "bag tunic" with the simple trim.  I only finished it this past weekend, and have yet to ask my husband to take some photographs of me wearing it to post here.
However, I'm still optimistic.  I still intend to work on the sprang hairnet, the Vendel tunic, and the herringbone wool apron dress I planned to make for some of the early challenges, and I might actually get to complete them in time for some of the challenges later in 2014.   We'll see what I can manage to do as the year progresses.

Sunday, June 29, 2014

The Bag Tunic, Complete

I have finally finished the Egyptian bag tunic I decided to make for the "Black and White" HSF Challenge.

As I feared, I did not manage to finish it for the May 15 deadline. By May 16 I had succeeded in cutting the keyhole neckline, sewing the side seams, and fringing the hemline.  I stitched the seams simply by folding each edge and whipstitching each folded edge together on the wrong side of the garment.  I was planning to enclose the seam by folding the edge back toward the seam and stitching them together, but that may create an awkward lump at the point where the bottom of the armholes starts, so I'm tempted to leave the seams as they are.   

The tunic didn't get done on May 16 because, after sewing up the sides and cutting the neckhole, I tried the tunic on, and found to my dismay that it was way, way too long.  Unbelted, at least six inches of tunic trailed on the floor, making walking impossible. With the tunic belted, I looked as though I was wearing a marshmallow.  Not a good look for me, or for anyone.  

So I cut about 5 inches off of the bottom of the tunic, and started fringing it again.  Now it is just long enough to lie upon my instep when unbelted.  I have to belt the tunic to make the width of it manageable. I've found that there are two viable ways to belt it.  The first involves running the belt through the armholes and tying the belt in front, so that it passes around the front and sides only, leaving the back free.  I like the look of the tunic when belted with this method, but the tunic doesn't seem to stay put very well this way; the cloth at the sides keeps slipping out and dragging on the ground, which usually means that one side soon becomes noticeably longer than the other.  The second method involves putting the belt around my middle from outside the sleeves while my arms are raised to at least shoulder height.  Tying the belt on this way holds the width in place better without looking too awkward; this seems to be the best compromise between grace and practicality.  

I folded the fabric over once around the armholes and sewed down the edges with a running stitch.  (I still dislike doing running stitch, but it doesn't show much in this particular location, and I need the practice.)  I didn't need to use a double fold because the sleeve end, like the edges that were seamed together, was a selvage.  

The neckline is finished with a rolled hem and the black cord is sewn around the finished edge, working from the reverse side so that the stitching doesn't show.  In the past, I have failed miserably at stitching rolled hems, but I discovered a website that explains the technique clearly enough for me to obtain a fairly decent-looking rolled hem; you can check out the directions I used here.  Once the neckline was hemmed, I used one piece of cord to trim the vertical part of the keyhole, and a second piece to trim the round part.  I allowed the cord to extend about 8 inches from each end of the curve so I can use the cord to tie the neckline closed, as in the sketch from Mary Houston's book that I reproduced in my last entry about the tunic. 

Overall, I like this tunic, but if I make another, I will make it narrower.  I should also see if I can find a fabric that is a bit drapier than the ramie I used here; I think that would result in a more graceful looking tunic. 

The Challenge:  #9 Black and White

Fabric:   Three yards of white ramie, purchased from a vendor on Etsy.

Pattern:   Pretty basic.  The tunic is nothing more than a piece of wide cloth, folded in half lengthwise and sewn down the sides at a distance of about 14 inches from the top fold, with a keyhole neckline placed appropriately on the folded edge.  I followed the information pack from the Petrie Museum on issues such as finishing.  Apparently, the Petrie's bag tunics are only shirt length (92 cm/36 inches long by 102 cm/40 inches wide), so I ignored their suggestions on proportions and made the tunic ground length and as wide as my fabric.  That may have been a mistake, but at least the results of it are interesting.  :-)

Year:   The Petrie Museum's bag tunics date to about 800 B.C.E.  They were worn during the Middle Kingdom, but became much more popular during the New Kingdom, according to the Petrie's on-line material on the subject. 

Notions:  Londonderry brand white linen thread, 80/3.  2 yards of black mohair cord from Wooded Hamlet Designs.

How historically accurate is it?   The pattern is based upon historical finds.  The ancient Egyptians were known for their ability to weave very fine cloth, and the sources I mentioned in my original post on this project suggest that they made ramie fabric, though it's unclear whether they used ramie for the clothing of living people and not just for the wrappings of mummies. I'm even less certain about the mohair cord, which is made from goat hair.  The ancient Egyptians certainly kept goats; but did they spin goats' hair into wool to make cord?  Did they use wool cord to trim their tunics?  I don't know; none of the tunics I know about have such trim on them.  Also, I can't be certain about the authenticity of my main construction stitches. All told, I'd say this one is about 60% accurate.

Hours to complete:   About an hour and a half for sewing the seams, 15 or 20 minutes to hem the armholes, approximately 30-40 minutes to try to even out the bottom fringe (the original fringe looked much nicer--I'm not much good at cutting fabric straight) and perhaps an hour to hem the neckline and add trim. Maybe four hours or so, but life kept interfering (which is why the finished product is about six weeks late).

First worn:  So far I've only worn it to check length and experiment with belt placement.  I hope to get some photographs to post here and on the HSF page by the end of this week.

Total cost:   A bit under $40.00 USD (nearly $30 for the fabric, including shipping, and nearly $9 for the mohair cord, including shipping).

Saturday, May 31, 2014

The Bog Blouse, in wear

Here are some long awaited photographs of my Bog Blouse, being worn.  The images are clickable for a larger version.

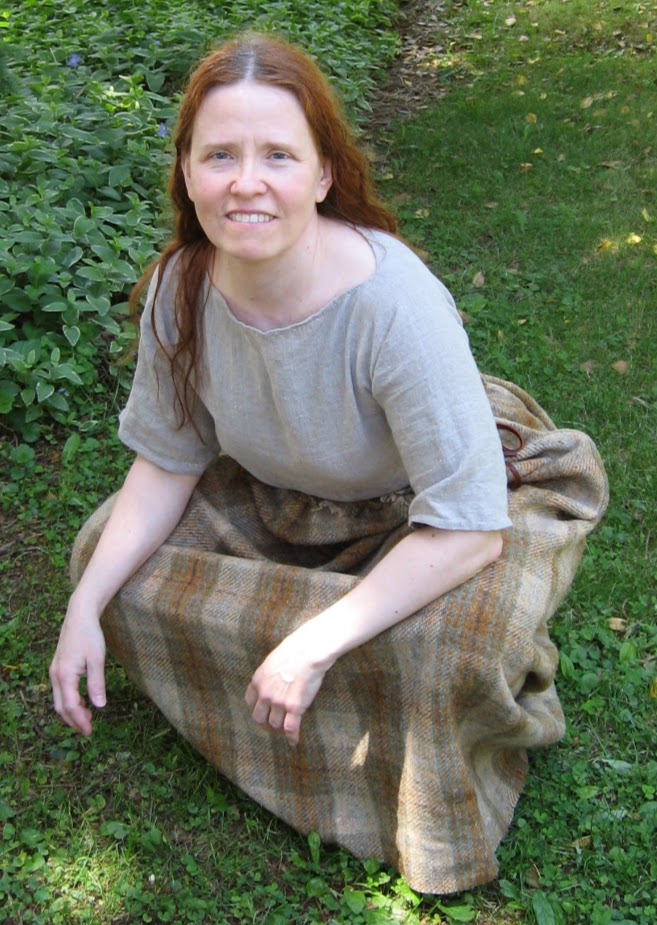
The blouse tends to pull uncomfortably around the armpits and the tops of the breasts, and the neckline binds a bit when the blouse rides up, but it looks surprisingly good when I have it on.  I made the skirt years ago, based on the Huldremose skirt; it's 100% wool in a 2/2 twill weave (which is period) but my idea that the pattern of the plaid is period is based upon rank speculation.    Still, the two garments look well together--and what's more, they look period, and that pleases me.  (I'll make a better-fitting bog blouse again, sometime).  All three photographs were taken by my loving husband.  Please forgive the funny facial expressions--I can't always manage to smile on command.

On my haunches--a more period posture, at least
The blouse, at rest
The outfit in (too) bright sunshine

Monday, May 12, 2014

Black and White--The Raw Materials

I ordered black cord and white ramie fabric for my Egyptian bog tunic, and both items arrived this week; you can see them in the photograph to the right.
The black cord and ramie fabric for my bag tunic

I like the ramie very much.  It looks a lot like linen, but feels cooler and smoother to the touch.  It's finer than the linen I buy from fabrics-store.com for my Viking clothing is, and a bit more translucent. I wonder how, and in what ways, the texture will change when I pre-wash it.  

Unfortunately, I had to spend a significant amount of time this weekend on a project related to my job, so I wasn't able to start work on the tunic. That, in turn, will make it tough, maybe impossible, to complete the tunic by May 15. However, I do intend to complete the tunic, now that I've bought the materials for the purpose.   I think it will look rather elegant when completed, though not as elegant as a Deshasheh dress would be.  It will be an excellent garment to wear in the summer, if only around the house.

EDIT:  (5/14/2014)  I managed to wash and dry the ramie tonight.  It feels just a little bit rougher than it did, but its drape seems unaffected.  Happily, the cut ends of the fabric frayed just enough to form a little fringe, just like the fringe you see on some ancient Egyptian garments. That will save me the trouble of hemming the tunic.  I won't have time to sew tomorrow night or Friday, but am cautiously optimistic about the weekend.

Tuesday, April 22, 2014

A "Black and White" Challenge

The Ninth Historical Sew Fortnightly challenge (due May 15) is "Black and White." As the name implies the challenge is to make a costume or costume item that is black, or white, or both.  I have a little more time now, and this concept seems simple enough that I should be able to come up with a suitable item to make for it.

Bag tunic.  From Mary Houston.*
Deshasheh dress**
Now, the hood for the völva's costume would be black and white, and one might think that I could simply do that for Challenge #9.  However, I'd rather save that hood for a different challenge. (Probably I'll try to finish the völva costume for the "Art" challenge (due June 1). Why? Because I think of the völva costume as a unified project, and though I'm willing to use items I'd planned for separate challenges as part of the final costume, I don't want to chop the entire costume into unrelated projects. Similarly, since I've already designated the white wool tunic as a separate challenge even though I blew the deadline, I'd like to leave that item as its own challenge. More importantly, I still need to keep the challenges fairly simple or they're likely to become UFOs ("UnFinished [Sewing] Objects"). 

So I figured that the best idea is to make a tunic--but an even simpler tunic than the wool Vendel period one. And that got me thinking about the ancient Egyptians.  

I had been thinking of making an Egyptian tunic for the "Black and White" challenge for a while, but I wasn't enthusiastic about the idea. Then a combination of associations changed my mind.  First, after reading the Dreamstress's post on her beautiful ramie shift, having a "shift of nettles" suddenly seemed tempting.  I thought of making an early Scandinavian tunic--until I remembered that there are no surviving shifts or shift fragments in Scandinavia until the Viking age (I'd be glad to be proven wrong on this one, but I doubt I will be). 

Then I thought of Ancient Egypt. Because of the dry climate and ancient funerary practices, plenty of bast fiber garments survive there--particularly linen. I've been thinking of making one of these designs--one found in Deshasheh--for years now. These dresses are a lot like the reconstruction used for the underdress of the Eura woman's costume from Viking age Finland, i.e., a middle piece onto which sleeve pieces are folded over and sewn onto the top, making long sleeves and a v-neckline at the same time. 

I also wondered whether a "shift of nettles" is period for ancient Egypt.  Possibly so. The Encyclopedia Brittanica claims that the ancient Egyptians used ramie.  One of the essays in Ancient Egyptian Materials and Technology (Paul T. Nicholson & Ian Shaw, eds.) claims that several scholars agree with the Brittanica, but "these identifications are not certain and more work needs to be carried out on the textiles in question." (p.  269).

For my purposes, it hardly matters.  I can engage in speculative fabric usage if I want, and ramie and linen, both being bast fibers, are difficult to distinguish, especially in the archaeological context.

Then I found this EBay seller who has "ramie linen" by the yard for $7.50 USD per yard.  That made up my mind to do an Egyptian tunic. I'd have bought the fabric already, except the seller is out of town and orders can't be taken until April 24.

That left me with only one question:  Deshasheh tunic, or bag tunic?  The bag tunic would be simpler, but not as flattering.  The Deshasheh tunic would be lovely--if I don't botch the proportions.

Given the hectic nature of my schedule, I think simpler is better--which makes the bag tunic the optimum choice.  Maybe I can find some thin wool cord to trim it; the Petrie Museum's educational pack on Egyptian costume suggests that would be an appropriate choice. We'll see how this project fares.

EDIT:  (4/23/2014)  I just had an inspiration last night.  I can buy wool mohair cord from this website, in black--and use it to trim the neckline of the white bag tunic I'm planning to make!  That way, it would really fit into the "Black and White" challenge!

*  Houston, Mary G.  Ancient Egyptian, Mesopotamian & Persian Costume (1920).  Paperback edition by Dover Publications 2011.

**  Photograph from the Petrie Museum of Archaeology, London.


Sunday, April 6, 2014

Fastest Project Ever!

My new Roman earrings
After failing even to begin four of the last six challenges, and finishing another one (the bog blouse) more than two weeks late, I am really happy to have a challenge I could finish on time, namely, my Roman earrings for this fortnight's HSF challenge.  I made them yesterday afternoon, doing a step at a time in between other chores that I was supposed to be doing.  ;-)

Threading the pearls onto the head pins was easy.  So was adding the crimp rings and closing them. But the crimp covers nearly turned out to be my undoing. I kept dropping them, and had a hard time keeping them in place long enough to apply the pliers in order to close them over the crimp rings.  They did not want to fit neatly over the crimp rings, and I bent one slightly trying to get it in place.  However, I finally managed to get them more or less closed and in position without mangling them too badly, and the earrings are small enough that it's nearly impossible to detect the mangling while I''m wearing them, unless you stand close enough to me to touch my nose with your nose.

Stephens's video claims that the Romans liked the s-hook design because it made it difficult for precious-bead earrings to accidentally fall out.  The same factor makes them tricky to insert at first (particularly since my head pins are especially thin and fragile).  However, by the time I got the second one in place for the first time, the process was going better.  I still have spare crimp rings, too, so if I ever have to remake them all I'll need are new head pins and a new set of crimp beads.

My current plan is to get enough beads make a matching necklace for the final challenge of HSF 2014 ("All That Glitters").  That will give me more incentive to finally do the makeover of my Roman garments.  I find I'm looking forward to that.

The Challenge:  #7 Tops and Toes

Fabric:   No fabric involved.  The earrings are made from two 10 mm rose gold glass pearls, two rose gold filled head pins, two crimp rings and two rose gold crimp beads. 

Pattern:   I followed Janet Stephens' tutorial video on how to make Roman earrings, except I added a crimp cover over each crimp ring to make it look as though there is a gold bead above each pearl.

Year:   First century C.E., more or less.  Jewelry styles often persist longer than clothing styles do, so similar earrings may have been worn centuries earlier or centuries later than the time period during which we perceive them as having been fashionable.

Notions:  See above.

How historically accurate is it?   The design and shape are period.  Gold wire and beads and glass pearls also are period.  However, some of the jewelry findings and the specific techniques (i.e., using pre-made head pins, crimp beads and crimp rings) are not.  So let's say 50%.

Hours to complete: Probably no more than 5 minutes all told (6.5 minutes, if you count the time I spent reviewing the Janet Stephens instructional video).  Possibly less.  If I'd had better tools for handling the crimp covers, it might have taken as little as a minute and a half.

First worn:  Only to confirm that I could put them on and take them off.  I need to get photographs of myself wearing them soon.

Total cost:  $9.16, including shipping!  (Pity I didn't save this one for the "under $10" challenge!)

Thursday, April 3, 2014

The Bog Blouse, Complete

New bog blouse--Front
Offered for your examination; my (rather) late Bog Blouse for HSF Challenge #5.  Once I finally nerved myself to start it, the Bog Blouse didn't take that long to complete (though it took longer than I'd hoped; see below).  During a less busy month, I might actually have managed to complete it close to on time.  So why did I hesitate?  Because I was afraid I would not be able to remember where to place the necessary cuts and would ruin my fabric to no avail.

In an attempt to avoid this fate, I dug out the original bog blouse I had made years ago from polyester imitation linen. Surprisingly, it still fits me quite well. Because the original blouse was long enough to tuck into my bog skirt as I wished, I decided to use it as my pattern in placing the cuts for this version. Photographs of my old, poly "bog blouse" (which was also hand-sewn) and the finished product for this Challenge appear below.

My fears, it turns out, were not groundless.  As I tried on the blouse-in-progress, I could tell that it was more snug through the body than the original. Worse still, the arms appeared to be too tight around the bicep and through the armpit, as I had feared, knowing that my biceps are now larger than they once were.  Yet I couldn't risk not making fully enclosed seams, in light of the fact that the raw edges of the fabric were already very frayed, particularly along portions of the main horizontal seam across the back and under the sleeves.  (I improvised by cutting small strips from the leftover linen pieces and stitching them over the areas where the seam allowance was closest to non-existent.)
New bog blouse--Back

Careful trying on of the blouse while I was finishing the seams has convinced me that the new blouse fits adequately, though it's more snug than the poly-linen version I made years ago. I'm a bit puzzled about the difference in fit, but the fact that the 100% linen I'm using frays so badly (forcing me to use more fabric width in sewing the seams) may have had something to do with it.  Or maybe it's just the fact that I can't measure by "eye" very well--and that's what I tried to do in making the cuts for the sleeves.

The Challenge:  #5  Bodice.

Fabric:   One yard of tabby-woven 100% linen in "natural", a grayish brown, from Fabrics-store.com.

Pattern:   Deduced (by others) from actual Scandinavian finds.  I used my last version of this kind of garment to place the cuts for this one.

Year1350 B.C.E., more or less.

Notions:  Londonderry 100% linen thread, in white, 80/3 thickness.  As always when I sew with linen thread, I run the thread over a cake of beeswax a few times each time I rethread my needle, before beginning to sew.  A bit of plied cord (in red or blue wool, perhaps, though I haven't found a supplier for such stuff since Wooded Hamlet stopped selling it) stitched around the neckline would have looked marvelous, but no such ornamentation appears in the archaeological finds, so (with regret) I did not attempt to add any.

My original, poly-cotton bog blouse
How historically accurate is it?  The basic pattern is from the Borum Eshøj find (other bog blouses are a bit different in cut if not in principle).  As far as I am aware, all of the bog blouses that have been found have been made from wool, not linen, but there is increasing evidence that more linen was worn in Scandinavia, and worn earlier, than was previously supposed.  Also, I do not know what types of stitches were used to make the Borum Eshøj blouse or other blouses of this type, so I finished my seams in much the same manner I used for my Byzantine himation. The originals might not have been finished in that manner because they are wool which has less tendency to ravel, but linen blouses of the same type (if any existed) might well have used a flat-felled or other seam treatment that encloses all raw edges.  So maybe 60-70%.

Hours to complete:   Roughly 4 hours, done in bits and pieces whenever I had a few minutes to spare over most of the last two weeks.

First worn:  Not yet.   I've only tried it on to check the fit.  I will try it on with the wool skirt originally made for the poly-cotton version of the blouse, and post some pictures of the outfit soon.

Total cost$0.  The fabric I got for accumulated store credit only, and the thread was originally purchased long ago for other projects.