Showing posts with label sewing. Show all posts

Thursday, October 3, 2019

The D-Shaped Veil--Complete!

My pretty hem!
At last my veil is finished, as you can see from the photographs accompanying this post.

I didn't quite manage to finish it during September.  I thought I would, till I came down with food poisoning on the evening of the 27th, and spent most of the weekend (after the vomiting stopped) in bed!  I thought of finishing it on the 30th, when I was feeling better, but even so I didn't think I could get the photographs taken and uploaded in time, so I decided to wait.

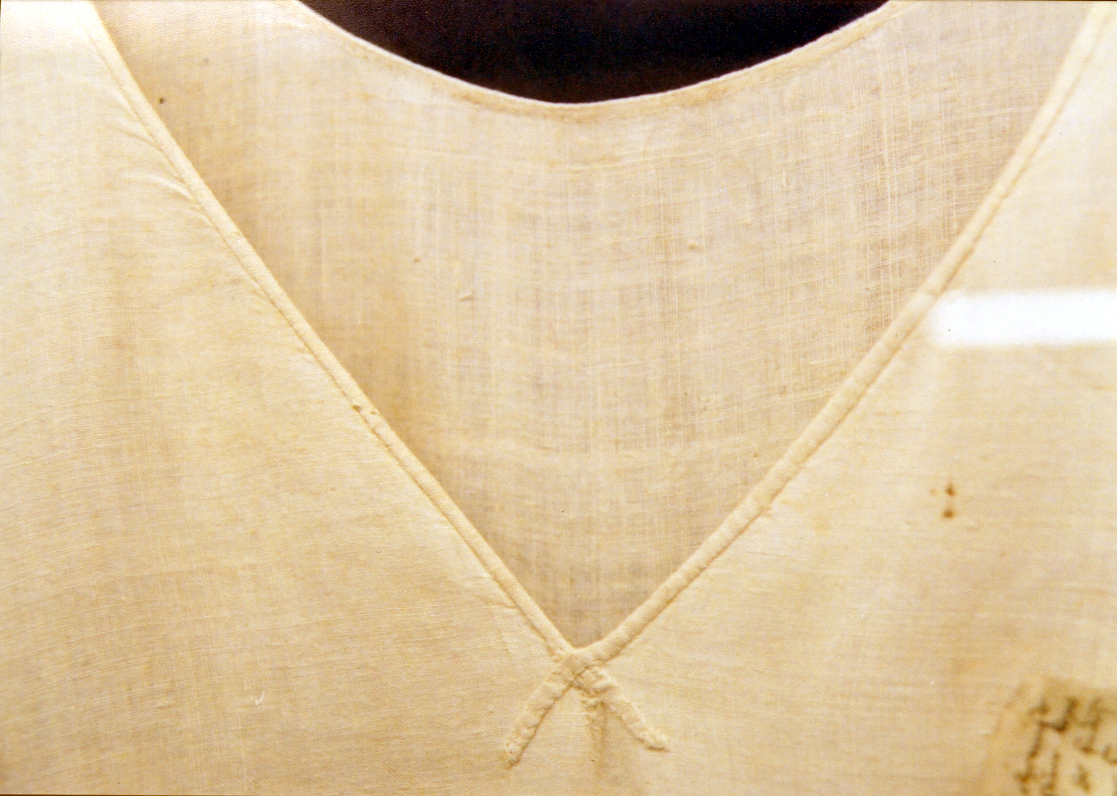
The first few photos show:  a close-up of part of the hem, right-side out; a close-up of the hem, wrong-side out, and the veil, lying flat, as a whole.  My stitching was not perfect, but the result looks fine after ironing the veil and hem carefully.  (Note:  the fabric is a pale light gray; the photo showing the hem from the right side comes the closest to showing the true color of the fabric.  I have no idea why the fabric looks so green in the photograph showing the wrong side of the hem.)

The not-so-pretty part.
My husband has been frantically busy with work, so I haven't gotten any photographs of the veil in wear.  In addition, I haven't been able to find my hlad or my wimple.  Perhaps it's just as well that the other accessories are going missing--it would be awkward to feature so many images in a relatively short post. I will post photographs of me wearing the veil eventually, but for now I'll just say that, of the techniques I tried, I like Edyth Miller's way of pinning the veil the best, whether or not it's provably period. Her technique produces the nicest looking result and requires the fewest accessories to achieve.  Overall, I'm satisfied with the outcome of this project.  This veil is certainly wearable, and I'm sure I'll find uses for it.

The September challenge for the Historical Sew Monthly is "Everyday."  After I saw Hvitr's post about her St. Birgitta's cap, which she submitted for the September challenge, I realized that my veil also qualifies.  It's made from wool, a common medieval fabric, and it's short--practical for every day.   So I will be posting photographs of it on the HSM Facebook page, eventually.

The Challenge--September: Everyday 

The whole thing.
Material: A piece of pale gray wool (blend?) gauze, roughly 19 inches (48 cm) by 30 inches (76 cm), donated by a reader of my blog (thanks again, Alison!).

Pattern:  I was inspired by Elena's post on her blog, Neulakko.  It's a D-shaped veil, as the photograph taken of the veil spread out on a flat surface shows.

Year: Medieval period. It's tough to be more specific than that.  Elina, who made the veil that inspired me, reenacts the 14th century, but similar veils crop up throughout the medieval period all over Europe, and might even have been worn by Viking women.

Notions:  Guttermann brand silk thread, in a pale gray which perfectly matches the fabric.

How historically accurate is it?  The whipstitch I used was certainly known in the medieval period, and wool is a period fabric. However, I'm not sure that my veil fabric is pure wool, and I don't have any leftover scraps to perform the bleach test on. Further, I'm not perceptive enough to determine from period artwork whether that artwork confirms the use of D-shaped veils, but the final appearance of my veil is not a bad match for at least some period art.  So 50-60%.

Hours to Complete: About 3 hours.

First Worn: Trying it on; my husband has yet to take photographs of me in it, because he is working on an important project.

Total Cost: Less than $4 USD--the cost of the silk thread I used to hem the veil.

Sunday, September 15, 2019

The D-Shaped Veil--Doing It My Way

Last night, when my husband and cat were asleep, I went back to the D-shaped veil project and attempted to make more progress.

Progress was slow in coming.  I kept having a hard time seeing where to put the needle in for the best results.  Despite that, I managed to sew another 3 inches or so...

And then I realized that I was sewing  the hem on the wrong side.  That is, I was working the hem toward the front side--where everything would be visible when the veil was in wear.  And I had quite a few stitches (maybe 10-12 to the inch) to undo.

So I undid the stitches, and started all over again.  This time, I decided that learning how to do a rolled hem was not in the cards for me.  Or, at least, it was not in the cards with this fabric.  Instead, I did a tiny double-folded hem (a bit like the one on St. Louis's shirt, a 13th century CE linen tunic) and whip-stitched the bottom edge to the base fabric with tiny stitches with my matching gray thread.  This is coming out so much better!  Now about 8 inches of it are done.  

We'll see how I feel about this decision when I reach the curved part of the veil, though!*


* Photograph from Heather Rose Jones's essay "Another Look at St. Louis's Shirt". The essay can be found here. The photograph I linked to from the essay was taken by Stephen Bloch.

Sunday, August 18, 2019

The D-Shaped Veil--How NOT to do a Rolled Hem

Tonight, I pressed the fabric from Alison and trimmed it into a D-shape, and proceeded to commence making a rolled hem.  Three things instantly became apparent:

1.  The farther-apart your stitches are, the less likely it is that your rolled hem will "roll" properly;
2.  The size of your initial fold is not as critical as I thought at first; 
3.  If the fabric wants to fray, you really need to turn the raw edge under, and then stitch through that fold, as well as through the top fold.

After I started paying attention to these things, I started having some success with my hem. However, the stitching process was very slow, since the stitches did not look right if they were farther than about 2-3 mm apart.  It took about 20 minutes to do about an inch worth of stitching.

But at least now it's started, and can be picked up and proceeded with at will.  Hopefully, it won't take too long to complete.

Wednesday, October 25, 2017

Cutting Voluminous Garments: A Rumination

Tacuinum Sanitatis (BNF Latin 9333)
Fol 103, 15th century CE*
Detail of mural at
Kanonikerhaus in
Constance, Germany,
c. 1320 CE*
Just a few days ago, I was reading a paper by Tina Anderlini on Academia.edu about 13th century European clothing, and how important it was to have the right elements in a costume, even though the basic element was simply a voluminous robe.   In a supplement to the paper, Tina gives sketches as to the cut of the clothing components. Links to the supplement may be found on Tina's French-language blog, Paroles d'Arts.  (The supplement itself is in English.)

As is apparent from the patterns sketched in the supplement, and from the photographs with Tina's blog post, 13th century garments such as the robe she writes about were voluminous, and featured from four to about half a dozen shaped gores.   That fact raised a question in my mind; how did people manage to cut out the pieces necessary to make such garments?

The answer may be simple for rich people's robes.  They would likely have been made by professionals, who could simply use a big table on which to spread the fabric and cut out any gores.  Because both fabric and gores were not very wide by modern standards, it was only necessary to have a reasonably smooth flat surface that was long enough and high enough off of the floor for ease of cutting.  The art of the 14th through 16th centuries does show clothes makers using or having such a table (see the images to the right).
Taymouth Hours (Brit. Lib. Yates
Thompson, fol. 180v), c. 1325-1335 CE*
But I have not been able to find, so far, a piece of period art from the 13th century showing the cutting of garments at the time of the clothing types described in Tina Anderlini's paper.  That raises a question.  Were big tables used at that time for clothing cutting? And what did poorer people do when they wanted to try making similar garments for themselves?

Tacuinum Sanitatis (BNF NAL 1673) Fol. 94,
Fol. 94, 1390-1400 CE 
The earliest art I found was an early 14th century mural of a woman trying to do something with shears and fabric held in her lap, though it did not appear as though she was cutting shaped fabric pieces for a tailored garment (upper left). I also found a 14th century marginalia piece purportedly showing St. Francis making himself a robe using the ground as a work surface, but that robe is not really a shaped or terribly voluminous garment, and the rolling hills shown in the image are not a plausible work surface, even for simple tailoring (lower left).

During the early Iron Age, fabric was woven and then sewn or pinned into garments with little or cutting, so this question did not arise.  Nor did it arise during the Migration Period or the Viking Age.  Based upon period artworks, clothing in those periods was fairly short (ankle length or just touching the floor at most) and was not very voluminous compared to fashions in later centuries.  In addition, most tailoring was simple.  It involved either small pieces (such as the Thorsberg trousers), larger pieces cut or torn along straight lines, perhaps with small cutout areas such as the curved sleeve heads and armpit gussets for which evidence was found at Hedeby, for example.  Some of the scraps found at Hedeby show slightly curved seams, which likely were made by subtly changing the width of the seam as one sewed. Probably all of these items could have been made without a solid horizontal surface.  I did most of the work on one of my apron dresses without a large flat surface.

In her study of the medieval Greenland clothing finds, Woven Into The Earth, Else Østergård suggests that the kind of shaped-piece cutting necessary for the kinds of late medieval garments found might have been accomplished by temporarily removing a door from its hinges and using it as a cutting surface.  (p. 94).  It is difficult to imagine a better cutting surface available to poorer people who made their own clothing, or a better example of people living far from the center of Europe, trying to emulate current fashions.

I will have to look more seriously for 13th century art depicting the cutting of clothing, to see whether better evidence for the door theory is available.

* All images in this post located on Karen Larsdatter's Medieval Material Culture pages.

Thursday, November 6, 2014

The Battle Plan, Post-Contact

Among military gamers (and serving military personnel, for all I know) there's a saying:  "No battle plan survives contact with the enemy."  This means, more or less, that no matter how good a plan is, real-world circumstances may reveal that it has so many problems as to be unworkable, or incapable of achieving the desired victory.

That's the sort of thing that's happened to my project for Historical Sew Fortnightly #20--Alternative Universe.  I planned to make a costume based upon the science fiction of M.A. Foster; specifically, a costume intended for "amorous dalliance" by a member of the constructed human subspecies featured in Foster's books called the ler.  This was to consist of a loose translucent blouse that tied at the hip and shoulder, and a long, flowing loincloth.  Because I saw the loincloth as the "easy" part of the project, and because I've been unusually busy at work, I figured I would wait to start until the loincloth fabric arrived.  

Well, the loincloth fabric didn't arrive from India ("Indian fabric") until a few days ago--shortly after the HSF #20 project deadline.  So any costume I make for Challenge #20 will be late (or will be forced into the "Re-do" Challenge or some other challenge).  

The fabric itself is great in some ways.  The color and motifs are exactly as pictured on the Etsy website of the vendor from whom I bought the fabric.  Unfortunately, the fabric, though very light, is not flowy; it's crisp and stiff--not at all what Foster's book depicts or the effect I wanted to achieve. It's possible that a few washings may soften it somewhat; I'm going to try that next.

But I have a bigger problem--the amount of fabric I have for the loincloth.  Because the price of this fabric was $12.00 USD a yard, I tried to economize by purchasing only two yards of the stuff. However, experimentation reveals that if I use the tuck-the-fabric under a belt in front and back method I planned, the loincloth will, at best, be knee length, not ankle or floor length as the book describes and as I wanted.   Grr.

The fabric is 44 inches wide.  I can cut it in half--into two 22-inch, two-yard long pieces--and sew them together, end to end.  This should be more than long enough for a tucked loincloth, but will be so narrow as to expose most of my thighs, which is also not an effect I intended.  Clearly, the economy I attempted to practice was a false one, because now I need to obtain MORE fabric to get the effect I originally visualized.  

But I still want to make the costume (especially since my husband really liked the glimpse he caught of me trying to tuck the too-short Indian fabric through my bead belt) so, poor economy or not, I'm going to proceed.  The question now is how, or whether, I can redesign the costume to get some use out of the fabric I already have--namely, the thin yellow jersey (jersey) and the Indian fabric.  These are the alternatives that occur to me: 

1.  Buy some plain sandwashed rayon fabric (2 1/2 yards at least) in a nice color (brown, say) for the loincloth and tuck a narrow panel of the Indian fabric over it, as an overlay.  Make the blouse from the jersey as originally planned.

2.  Give up on using the Indian fabric for the loincloth altogether.  Buy plain sandwashed rayon or something similar and use it for the loincloth; make the blouse from the jersey as planned.

3.  Buy some plain sandwashed rayon fabric in brown for the loincloth.  Make the blouse from alternating panels of the Indian fabric and the jersey.  Or (better) use the Indian fabric for the long, sash-like bottom piece of the blouse (the piece that ties at the waist), and make the rest of the blouse from the jersey.  

Right now I'm leaning toward alternative 3, but I will cheerfully listen to advice about how to proceed.  If you're at all interested in this costume idea of mine, please step up and let me know what you think in the comments.

EDIT (11/22/2014):  I took Beth S.'s advice (see Comments) and bought a yard of a soft, thin jersey to piece in to my fabric where it won't show (i.e., as the part that will actually touch my crotch). Now to do the actual washing and sewing.

Tuesday, November 12, 2013

The Himation: A Quick Update

With November 18 (the latest Historical Sew Fortnightly I'm hoping to make) fast approaching, I figured that it's time for another update on my Byzantine tunic (himation) project.

The tunic-in-progress is still essentially a flat piece (though the gores and sleeves are sewn onto it) because I got bogged down in trying to sew my blue linen strips around the neckline.  Part of the problem is that I cut the strips on the straight of grain because I did not have enough blue linen left to cut them on the bias, but another part is the inevitable consequence of trying to fit a broad strip along a sharply curved neckline.  In the end, some tucks (and a non-period steam iron) will be involved, but I will make it work.  At this point, I've gotten the trim about three-quarters of the way around the neck and have sewn it on the sleeve-ends as well.

I have given up on adding the purchased trim to the tunic, not because I can't find it (though in fact I haven't found it yet), but because although the colors of the trim and linen work together, the textures would be all wrong.  The purchased trim is very stiff and tightly woven, and has a very slight sheen.  Texture-wise, it's everything the linen is not, and that would create the wrong effect for the tunic.

So, for now, I'm going to stick with using the blue linen alone as trim.  Later, if I can think of a suitable motif, I might consider adding embroidery even though I haven't dabbled in embroidery for almost four decades now.  The recreated himation on the Levantia web site that inspired this project has a simple embroidered design based upon crosses inside of circles (you can see it in this photograph), but I'm not at all confident of being able to make the crosses or circles symmetrical enough to look good.  If anyone has any alternative suggestions, please comment on this post.  

There's also a question of what kind of thread I should use.  I'd use wool, except I want the dress to remain washable.  That argues for a commercial embroidery floss, or for linen embroidery thread.  I don't have either of those things and I need to keep costs down.  Suggestions on this issue would also be greatly appreciated.

Monday, October 7, 2013

Finally Joining the Historical Sew Fortnightly

So after months of waffling, I am finally going to take part in the Dreamstress's Historical Sew Fortnightly.

As the Dreamstress explains in the post I link to above, the purpose of the HSF is to provide more incentive for historical costumers to sew by setting a series of historical (i.e., 1938 CE, or earlier) costuming challenges for the year, one every two weeks. One can choose to work on a challenge many weeks in advance, or try to do them all, or something in-between.

Which challenge am I doing? That's hard to say. I know what garment I'm making for the challenge--my long-planned Byzantine himation.   However, there are quite a number of ways I can fit that project into the remaining HSF challenges.   My hope is to get it done by October 21 for Challenge #21: Colour Challenge Green--since the linen from which I'm making it is boldly and lusciously apple green. However, if I miss the 21st, I could finish it under the auspices of Challenge #23: Generosity and Gratitude (due November 18), since my idea, as well as much of the information, for making it in the first place came from Peter Beatson's page on the Manazan shirt (since there's no point in making underwear if you're not going to make an outfit to wear on top of it) and Timothy Dawson's Levantia site (which triggered my interest in Middle Byzantine clothing).

If I blow the November 18 deadline, there's still Challenge #24: Re-Do (due December 2). This is the one where you can do, or re-do, a prior challenge. My himation, which solidly meets the criteria for Challenges #21 and #23 at least, would fit in handily. However, the himation project meets several prior challenges too, such as # 8, By the Sea (it's a Byzantine tunic, and Byzantium a/k/a Constantinople a/k/a Istanbul was, and is, a seaport); #11, Squares, Rectangles and Triangles (which is an excellent description of the himation pattern); and #17, Robes and Robings (because the himation is arguably a robe, and it will be trimmed with broad strips of linen, which arguably are robings).

As of today, I have finished cutting out my pattern pieces, so all I have to do is stitch them together and add my trim.   Most of the stitching I will be using will be whip stitches, which I can do quickly, so I should be able to complete it to at least a wearable condition by December 2.  Wish me luck!

Sunday, July 21, 2013

Research on Sewing Kits

A few years ago, inspired by some research done by pearl, I assembled a plausible Viking-era sewing box and wrote about it here.

A few days ago, I was thinking about sewing kits (i.e., assemblages of sewing equipment kept in a special container) again. This time, it occurred to me that there are pages about period sewing equipment other than pearl's sewing box project (which can be found here) and it might be a public service for me to list some of them.

For example, this site features research by Jennifer Baker, including photographs of period textile tools, for the late Anglo-Saxon period. Here, someone whose SCA persona name is Coblaith Muimnech has written about assembling inexpensive medieval sewing kits to use as gifts.

For anyone who wants to assemble their own sewing kit and document it from scratch, Karen Larsdatter provides links to a wide range of images of sewing and photographs of actual surviving Early Period sewing kits and sewing equipment here.  Over here, there is a sketch and other information about a 7th century C.E. Anglo-Saxon box that might also have been used as a sewing kit.

It's important to remember that sewing kits come in all shapes and sizes, and probably always have done so.  For example, Penelope Walton Rogers notes, in her book Cloth And Clothing in Early Anglo-Saxon England, AD 450-700* that it's possible to deduce that women in early Anglo-Saxon England often wore soft bags at their waists from the number of archaeological finds of small lumps of sewing materials--needles, balls of thread, etc.--found close to the skeleton between waist and thigh level:
Clusters of objects are often found between the waist and thigh in women's graves, generally on the left-hand side, and sometimes as low as the knee or calf. These were probably suspended from the belt, either individually or in a bag, and are therefore termed 'girdle groups' or 'purse groups'. ... The bags themselves may be represented by ivory rings, 100-150 mm across, which formed a frame for the bag mouth; or by a variety of iron and copper-alloy rings, which may be from smaller, sock-like bags. Other metal rings, however, are clearly for the suspension of objects such as keys, while further examples seem to be part of the general bric-a-brac kept in the bag. This bric-a-brac includes broken brooches, clews of thread, textile hand-tools, beads, amulets, glass cullet, and all sorts of objets trouvés.
Page 134 (internal citations omitted). So at least in early Anglo-Saxon England, "workbags" are period.  Some of these bags apparently had rings to control the opening.  I think such bags worked somewhat like this kind of medieval bag design.

After the Middle Ages, intact and partially intact sewing kits are more likely to be found.  Eighteenth-century kits were likely to be assembled in a fabric pouch or wallet, as with the example of a reenactor's kit and research here. Such kits were called "housewives" or some variation of that word and were still being made and used as of the American Civil War; a photograph of a surviving housewife may be found here. World War II servicemen in the Canadian army received a strikingly similar kit, a picture of an original appears here.

How sewing tools were kept during a particular period doesn't really tell us much about the history of clothing, but it does tell us much about how sewing was regarded, how valuable the tools were, and who was doing it.  In later periods, for example, military men were issued sewing kits because it was not practical for them to have someone else repair their clothing in the field so they needed to be able to conveniently carry sewing tools with themselves.  One wonders why Anglo-Saxon women carried their textile tools with them, and whether Viking women did keep thread and sewing tools that could not easily be hung from brooches in special bags, baskets, or boxes.  It would be hard to believe that they did not, but until a seamstress's equivalent of the Mastermyr box is found, we won't know for sure.

EDIT: (7/21/2013) I was wrong about the absence of Viking sewing box finds. I just learned from Carolyn Priest-Dorman that there are archaeological finds of Viking era sewing boxes. At least one, a wooden box with iron bands, was found in the Viking era cemetery in Cumwhitton, Cumbria in England. A copy of the journal in which an illustrated article about the box was published may be downloaded here.


* I looked up Cloth and Clothing in Anglo-Saxon England on Amazon to confirm that I'd gotten the title right before tracking down my copy to reproduce the quote. When I did so I learned, to my sorrow, that copies are selling on Amazon Marketplace at prices ranging from $325.00 USD to $900.00 USD. Apparently, Cloth and Clothing in Anglo-Saxon England is already out of print; I paid about $35.00 USD for my copy when it first came out in 2007. Sigh.

Saturday, April 25, 2009

Sewing the Period Way--Some Observations

Tonight, I started working on my savanion. Now, I'm not only using my bronze needle, but I'm using linen thread (80/3, in case you were wondering) to sew it. This is the very first time I've sewn with linen thread.

I've been waxing each sewing thread by running it across my beeswax bar a few times, then running the thread between my fingers once or twice before I thread it into my needle. I'm doing this because I've been told that linen thread tends to be rough, and to be difficult to draw through the cloth (even if it's linen cloth) unless you wax it first.

I expected that the beeswaxing ritual would be an annoyance, and would do little good. Again, to my surprise, the technique works rather well and isn't that much of a distraction. The waxing also has the advantage of stiffening the thread just enough to make it much easier to thread it into the eye of the needle.

In addition, I've noticed that getting the thread off of one of my floss bobbins is turning out to be no more trouble than unwinding thread from a modern spool, and the deep notches on the bobbins keep the remaining thread from unraveling itself from the bobbin much better than the shallower notches on many modern spools do.

The moral of this story is, in my opinion, that the period way really is practical, if you understand it well enough to do it right.